

What is a Take?
In Sabes Pro, a Take is an immutable snapshot of your DAW project saved to your local encrypted repository when you press save (Ctrl+S) in your DAW. Each Take stores session changes, timestamp data, and audio asset references.
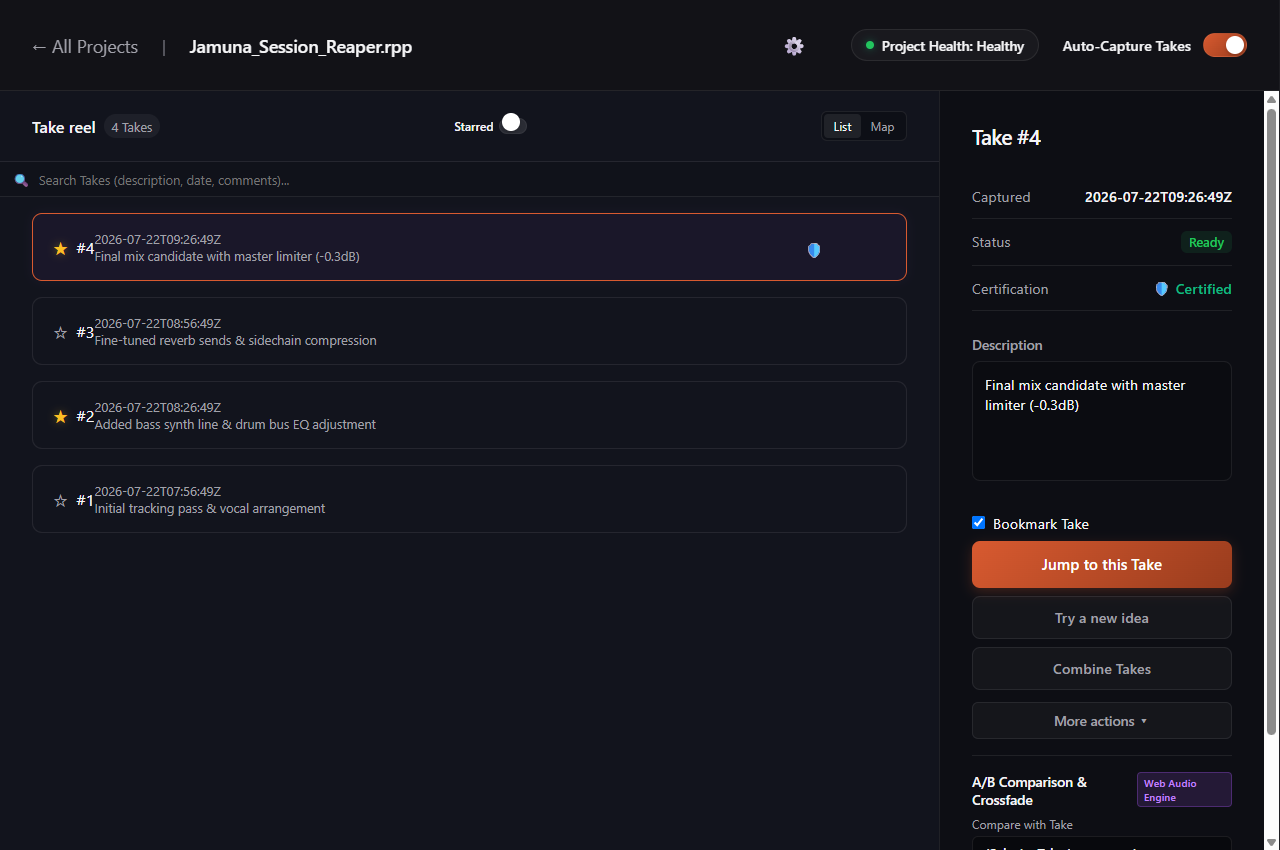
Navigating the Take Reel Interface
Opening a project card in the dashboard opens the Take Reel interface, which includes three core panels:
- Chronological Timeline: A visual node timeline listing every save event from project creation to your current edit.
- Take Details Panel: Displays details for the active Take node, including exact timestamp, delta file size, track counts, and plugin inventory (for REAPER and FL Studio).
- Action Toolbar: Quick action buttons to Restore in Place, Branch to New File, Certify Take, or Compare A/B Previews.
Pinning Important Milestone Takes
Studio projects often accumulate dozens of save snapshots. To mark key production milestones (such as "Rough Mix V1", "Lead Vocal Tuned", or "Final Mix Pre-Mastering"), you can Pin a Take.
How to Pin a Take: Select a Take node on your timeline and click the pin icon in the Take details panel toolbar, or right-click the node and select Pin Milestone Take.
Key advantages of Pinned Takes:
- Pruning Immunity: Automatic background retention rules will never prune or delete a Pinned Take, regardless of snapshot age.
- Custom Labeling: You can assign custom names and color badges to Pinned Takes for quick visual navigation.
Restoring vs. Branching a Take
When selecting a historical Take snapshot, Sabes Pro offers two distinct restore workflows:
Option A: Restore in Place
Restoring a Take overwrites your current active project file on disk with the selected historical snapshot. Before overwriting, Sabes Pro creates an automatic "Pre-Restore Safety Snapshot" of your current working directory, ensuring zero data loss.
Option B: Branch into a New Session File
Branching creates a copy of the selected Take snapshot as a new session file (e.g. SongTitle_Arrangement_Branch.rpp). Use this option when testing alternate mix ideas without altering your primary project file.
Comparing and Combining Takes
Sabes Pro provides comparison workflows to audit differences between your Takes:
- A/B Audio Comparison: Select any Take on your timeline, choose another Take from the comparison dropdown menu in the details panel, and crossfade between their audio previews to evaluate loudness and mix changes.
- Combine Takes: When resolving diverging timelines, select two Take heads and click Combine These Takes to compare their metadata (tracks count and file size) before deciding which branch's changes to keep.